
Another season, another new Facebook-related platform in the mix. It was just a year ago that we published this post introducing Creator Studio, and less than two years since we dug into the (then) new Business Suite. Facebook’s recent rebrand as Meta may have had more to do with reputation than meaningful functionality changes, but frankly, Facebook/Meta’s myriad apps can take up a lot of real estate on your phone or desktop — not to mention your brain.
After more than a few occasions clicking around dizzily to locate the functionality needed, we decided the time had come to wrestle this monster to the ground. Read on for five tips to regain control when navigating Meta, Creator Studio and Business Suite.
1. Download all 3 apps on mobile and bookmark them on desktop
If you actively manage Facebook business pages for yourself or business clients, you will need all three apps on both mobile and desktop: Business Suite, Creator Studio and Facebook.

On desktop, the Business Suite is referred to as Meta Business Suite. Capture and bookmark all of these links:
- Facebook: https://business.facebook.com
- Meta Business Suite: https://business.facebook.com/latest/home
- Creator Studio: https://business.facebook.com/creatorstudio/home
2. Get acclimated to navigating Meta’s apps on mobile
With social’s evolving shift to favor video and reels, the tool of choice is mobile. While the ability to utilize video reels from a phone to desktop seems to be on the horizon, it’s neither nimble nor reliable at present.
While many aspects of navigating Facebook and Instagram on mobile are cleaner than on desktop, the continual changes and duplication within the apps seem to be clear evidence that the changes aren’t over. A prudent approach is to get reasonably comfortable with Creator Studio and Business Suite on both mobile and desktop, including how to cleanly shift between your personal and business profiles.
3. Dig into Creator Studio functionality on mobile
On mobile, Creator Studio has a very straightforward navigation, which enables an admin to view published, scheduled or draft posts, as well as edit and create posts including video, live or other post types. In contrast, the desktop user experience (currently) shifts the user between platforms in a way that can be confusing.
Upon opening the Creator Studio app on mobile, the initial Home screen is focused on video performance stats. Most of the navigation is found on the bottom panel of the screen, where you’ll see a series of icons for navigating the scheduling apps.
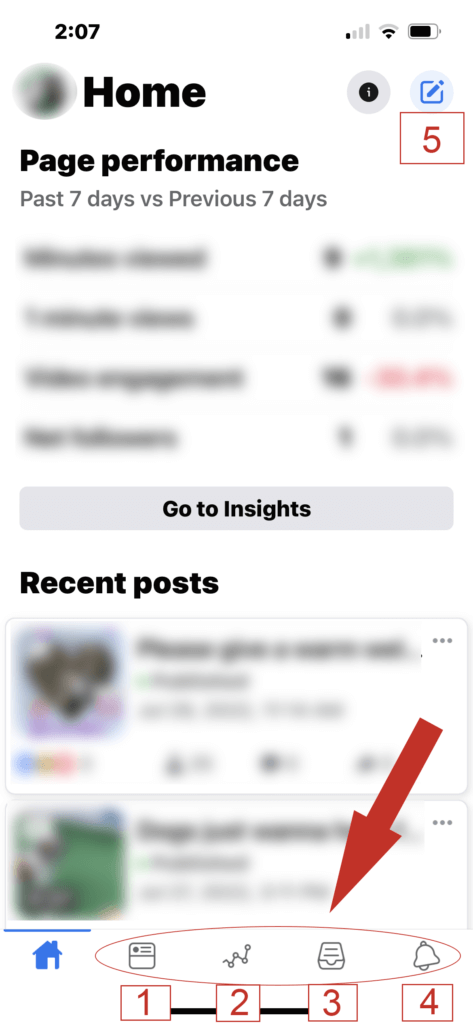
1 – Posts: Tap this icon to get to the Posts page, where you can choose and view and edit Published, Scheduled or Draft posts.
Drilling into the Posts page, you’ll find:
- Icons at the top of the page, to search, filter (for published, scheduled or draft posts) or create a post
- Next to each published, scheduled and draft post, you’ll see three horizontal dots to access insights, edit post, copy link or delete
2 – Insights: Performance stats for your published videos.
3 – Messages: Inbox messages and post comments.
4 – Notifications: Page mentions and updated status for scheduled content.
5 – Create a post: (at the top of the screen, next to Home) Scrolling up to the top of the Home page, you’ll see the Create menu, indicated by a pencil.
Once in the create screen, you’ll note options to create a new post, photo, Live or text post.
4. Learn to create, schedule & view insights on desktop Creator Studio
In contrast with mobile, where the key navigation elements are found along the bottom, in the desktop version of Creator Studio the navigation is along the top and the left sidebar.
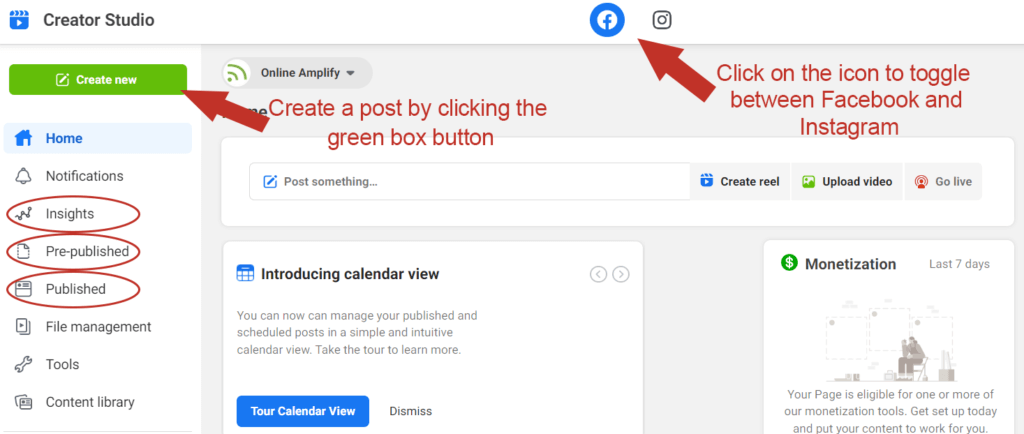
- Select your platform: Note the icons representing Facebook and Instagram at the top center. The active platform is highlighted in color (in this case, Facebook) and applies whether creating content or viewing draft, scheduled or published content. The platform must be selected prior to clicking the Create new button (top left).
- Create new: The Create new button options are different for Instagram (just two options both involving videos) and Facebook (where options include post, reel, story, video, Live and tests).
- View insights: Along the left side, Insights defaults to video performance. To see insights for non-video content, scroll down to Published.
Key tip: To see insights for non-video content, scroll down to Published
The screenshot below shows pre-published posts. Note the toggle options for viewing Scheduled or Draft posts on the upper left.
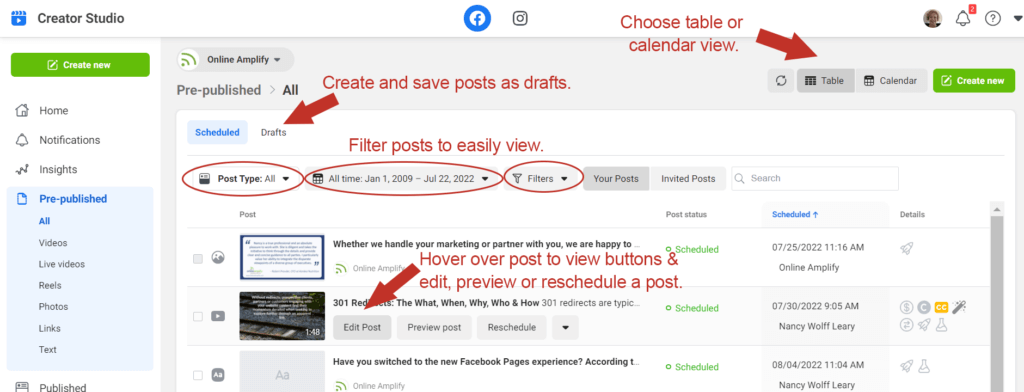
- Choose your view: On the top right, select table or calendar format for viewing
- Utilize filters (in the upper middle) for post types, date ranges and other options
- Select post types, including videos, photos or posts with links
Key tip: To preview, schedule or edit a post, mouse over the post teaser
to expose the buttons to edit, preview or reschedule a post.
5. Toggle (with care) between interacting as your Page and yourself
When navigating between Facebook, Creator Studio and Business Suite, it’s easy to become confused about whether you are interacting as yourself (your personal profile) or as your Page. On desktop, note the down arrow next to the active avatar and click on it to expose other choices. Always verify that your avatar shows the appropriate persona.
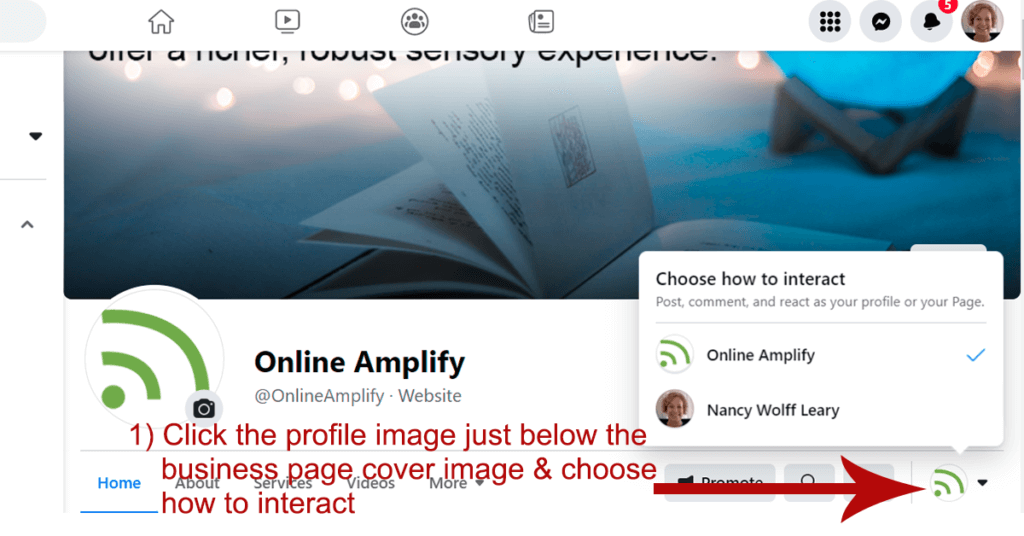
Even if you’ve selected the appropriate icon to interact as your page, it’s a good practice to double check your avatar beneath any post prior to engaging, to ensure you are posting as the intended profile (yourself or the page). In some cases, you’ll see a message with a yellow triangle beneath a post, verifying that you are posting as yourself (not the page).
To engage as yourself on mobile, in the traditional Facebook app, type the page name in the search box at the top of the page. Prior to sharing or commenting on a post, confirm that your avatar shows as yourself. Note the down arrow to toggle to a page that you manage. Clicking share, you’ll see additional options to share to another page and in a group, as well as other options.
Last words about Meta platforms
Take a deep breath and be prepared for changes. If there’s one thing for certain about Meta platforms, it’s that they’re in constant flux.