Welcome to 2021. More than any year in memory, this new year brings a welcome fresh beginning. Regardless of whether you make formal New Year’s resolutions, the start of a new calendar year inspires renewed focus and prioritization.
Our busy daily lives make it challenging to stay on top of everything. To-do lists are long; work is intense; family and other commitments pile up. Despite the best of intentions, some priorities get sidelined. For many, technology-related upgrades and updates add more challenges to overflowing plates.
To kick-start the new year, this How-To post offers help to demystify the WordPress Block Editor. The user experience is quite a change from the Classic editor and may be challenging your productivity. We’re here to help.
Finding your way: Navigation menus
One of the most off-putting aspects of the new block editor is that there’s no single navigation menu. Instead, formatting and functionality options are found in several locations, and are triggered by different actions.
The main menu (which appears on the sidebar) is suppressed when you click within the body of a post, but it can always be accessed by clicking on the blue box with the “+” symbol in the top navigation bar.
When you are in edit mode, a small formatting menu (see below) floats directly above the active block.

This menu includes two icons that enable you to easily rearrange content while in edit mode. The second icon above, with the six dots, allows you to drag and drop the selected block. And the third icon with arrows at top and bottom enables you to move the block up or down one block at a time.
Top navigation menu
Starting at the top, the first menu you’ll see is shown below. While some of the icons aren’t intuitive, hovering over them quickly exposes what each one signifies.
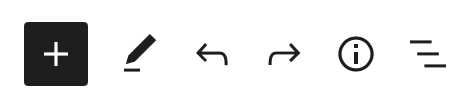
You’ll see that that the first + icon represents Add block. A block, as defined by the new editor, is any element on your page — a heading, image, text, quote, embed or “more” link … (you get the picture). To add a block, select the + icon on the top nav, or simply click return within the body of the post to automatically add a block.
We’ll dig more into blocks in just a moment; but first we’ll cover the other top-nav items. The editing pencil refers to mode, where you can select a block in order to format it. The curved arrows are undo and redo. The circle with the lower case i (for information) shows the content structure of your post or page, including word count. The final item in the top nav (that looks like a leaning bullet list) is the block navigation, a snapshot of the block elements for the page or post. Why that tidbit of information merits valuable top nav real estate is a mystery.
Building a post in the block editor
The most confusing part of the Add block menu (indicated by the + sign) is that the first sub-menu item shows a haphazard grouping of Most Used elements. If you’re a rookie with the new editor, scroll past this sub-menu and explore the remaining menus in sequence to get a sense of the available items and where to find the ones you’re looking for.
Below we’ve highlighted key blocks accessible by the Add block menu (+), and where to find useful functionality.
Most used styling items
Many of the items now found in the Most Used menu were accessed through the top navigation menu in the Classic Editor. You can select your font style (paragraph or heading) and drill down on heading to various sub-head sizes. Also within the Most Used menu are options for media as well as styling for a bullet list or quote.
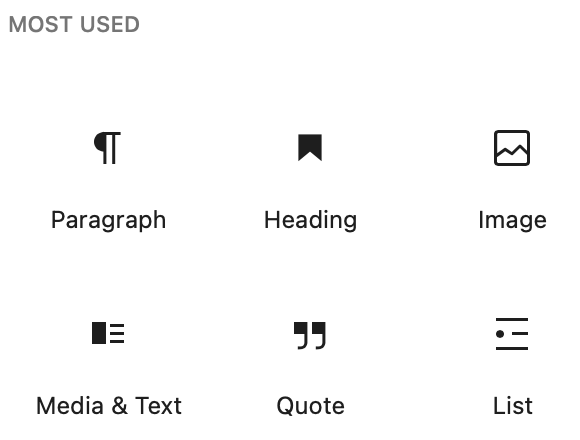
Most used menu
For more formatting choices, scroll down to view the other menus.
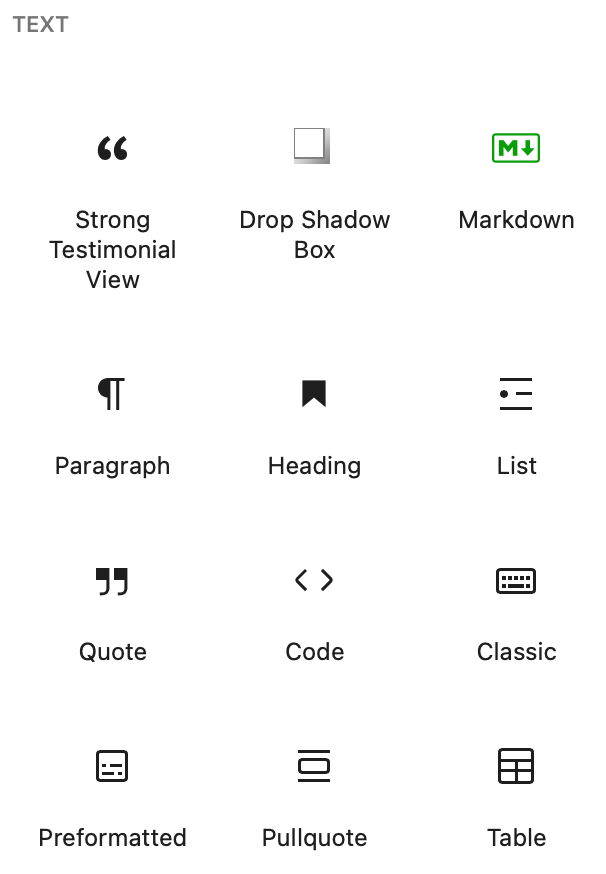
Text and formatting
The Text menu includes some of the formatting items found within the Most Used menu, as well as some additional styling options. Some useful options within this menu are List (to use bullets), Quote (to highlight a quote or key point), Table for a pre-formatted table and Code, which allows you to to view and edit HTML.
While this block also includes the option to return to the Classic Editor, in the spirit of resolutions, we implore you not to select this alternative.
Text and formatting menu
Media
Predictably, the Media menu includes options to insert an Image or Video, but it also offers some more imaginative visual options including Slideshow, Image Compare (a side-by-side layout) and Tiled Gallery. Other alternatives in this menu include Audio — for a podcast, and the Media & Text item (shown below) that allows you to place an image side-by-side with text.

The Media & Text item within this menu allows you to select the size of the text which is placed to the side of your image.
Design elements in the block editor
The Design menu (previously known as Layout Elements) is home for various layout-related elements including Spacers, Separators and Buttons (with options for shape and style as well as background and font color). After styling the button, click on it to specify a link destination and options.
Other items available in the Design Elements menu include the Page Break and More widgets. The latter (typically used on a blog category page) displays a snippet preview of the post with a “more” link to view the full post.
Widgets
You may not have realized previously that much of the functionality you routinely use in your WordPress posts is afforded by widgets. The items in this expansive menu are based on the widgets (plugins) used on your website. Blog widgets such as Categories, Tag Clouds and Popular Posts are included in this menu.
Additional navigation
An additional menu on the right side of the post can be generated by clicking the three vertical dots on the right side of the top navigation bar. This menu toggles between two tabs: one for the Post being edited, and the other for an individual Block.
The Block menu is automatically enabled when you are in edit mode within a block. Depending on the type of block, options include items like Typography (font options) and Color Settings (background and text color choices).
Nearing the finish line: The Post menu
The Post menu includes several sections. From the top, the Status & Visibility menu includes options to Schedule (or Publish) your post and to Stick the post to the front page, if desired.
Permalink allows you to view and edit your post URL — an especially important item if you have changed your post title during the editing process.
The Categories and Tags menus are relatively unchanged from the Classic Editor: Existing categories are displayed, along with a link to Add New Category. Previously used tags are suggested when typing in the box to Add New Tag.
The lower section of the right nav menu allows you to set a Featured Image and designate an Excerpt (to specify the teaser summary for your post in search results) and allow or disallow Comments.
Last words: Classic Editor
Change is hard, and it may take some time to get used to the new editing experience. If you’re highly frustrated, it is possible to revert to the Classic Editor (see the Text Menu paragraph above).
However, in the spirit of resolutions, we encourage you to use this post as a guide and give the new editor a try. It has some neat features that don’t require HTML skills. Consider that at some point (likely when you’re up to your ears in top priorities), support of the Classic Editor will cease and you’ll have no choice but to migrate to the block editor.
Want more website support?
You’ll find posts about website optimization and blogging on our website, as well as downloadable resources and educational videos in our Resources section. If you need help creating content, handling the back end complexities or keeping you on track, let’s talk.
This post was previously published on OnlineAmplify.com and has been updated for accuracy and relevance.